
Make Your Own Fly Fishing Lures Guide. Tired of buying expensive fly fishing lures that don’t work? Learn how to make your own fly fishing lures and save money. This guide shows you simple steps to create effective flies. You’ll discover the best materials and techniques for success. Start catching more fish with your custom creations.
Make Your Own Fly Fishing Lures Guide to Making Custom Flies
There’s a unique satisfaction that comes with landing a beautiful trout or a feisty bass on a fly you tied yourself. It’s more than just a catch; it’s the culmination of skill, artistry, and a deep understanding of the aquatic world. While buying flies off the shelf is convenient, the journey to make your own fly fishing lures opens up a world of creativity, cost savings, and a profound connection to the sport.
DISCLOSURE: Some of the links on this page are affiliate links, meaning, that at no additional cost to you, I may earn a commission if you click through and make a purchase. Affiliate commissions help fund this website, our rare fishing trips and my extreme coffee addiction.
Getting Started: What You’ll Need to Make Your Own Fly Fishing Lures
Fly Tying Tools Needed For Getting Started Video.Many beginners opt for a make your own fly fishing lures kit as a convenient way to get started, as these kits typically include the basic tools and a selection of materials to tie common patterns. You can also get essential tools for fly tying and basic materials for fly tying separately.
Fly Tying Kits
For those just beginning to make your own fly fishing lures, a make your own fly fishing lures kit or a dedicated fly fishing lure making kit is an excellent starting point.
You can try one of this premade Fly-Tying Kits below.


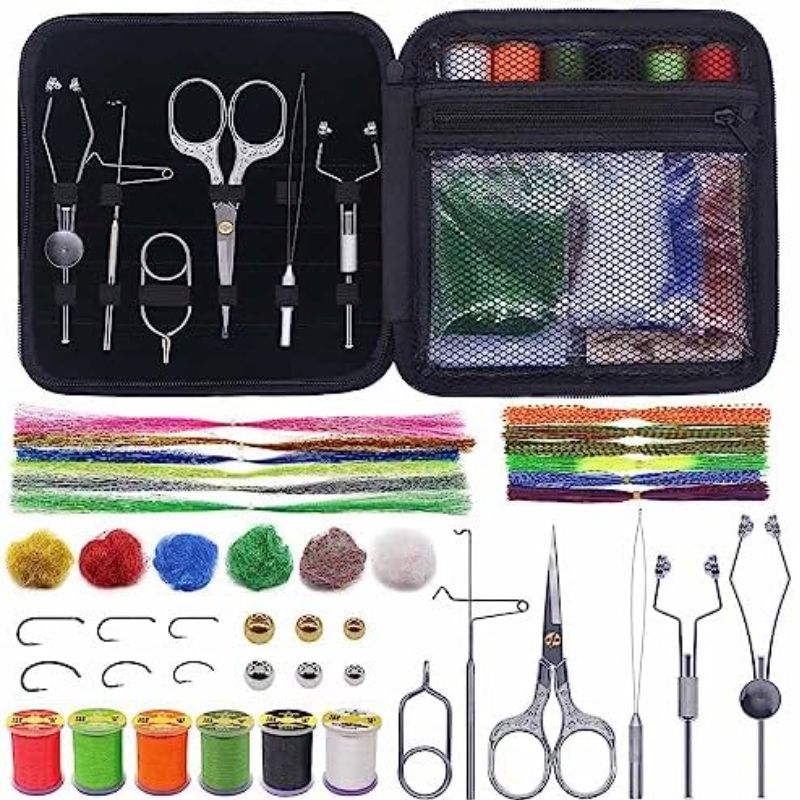
All offer quality beginner kits that include a basic vise, essential tools, and enough materials to tie a variety of popular patterns. These kits take the guesswork out of selecting individual items and provide a streamlined entry into the hobby.
Essential Tools for Fly Tying
Fly Tying Essential Tools You Need Video.What fly tying equipment do I need? You’ll need a few key Essential Tools for Fly Tying. A good vise holds your hook securely. Bobbin holders manage your thread. Hackle pliers grip feathers and fur. Scissors cut materials precisely. A whip finisher ties off your fly head. Dubbing needles help apply dubbing. These basics let you start tying flies.
- Fly Tying Vise ► LINK – This is your most important investment. It holds the hook securely in place, freeing your hands to manipulate materials. Rotary vises offer more flexibility, allowing you to rotate the hook 360 degrees, but a good quality non-rotary vise is perfectly sufficient for beginners.
- Bobbin ► LINK – Holds your tying thread and allows it to spool off smoothly while applying tension. Look for one with a ceramic tube to prevent thread fraying.
- Scissors ► LINK – You’ll need at least one pair of sharp, fine-tipped scissors specifically for fly tying. Don’t use your household scissors, as they’ll quickly dull on synthetic materials.
- Hackle Pliers ► LINK – Used to grip and wrap delicate feathers (hackle) around the hook shank.
- Bodkin (or Dubbing Needle) ► LINK – A simple needle-like tool used for applying head cement, picking out dubbing fibers, or untangling materials.
- Whip Finisher ► LINK – This tool helps you tie a neat, secure “whip finish” knot to complete your fly, often considered the most professional way to finish. While you can learn to whip finish by hand, the tool makes it much easier for beginners.
- Threader (optional but helpful) ► LINK – A small wire loop to help thread your bobbin.
Basic Materials for Fly Tying
Basic materials you need to start tying Video.What fly tying materials do I need? You’ll some Basic Materials for Fly Tying. For starters you will need hooks, thread, and hackle. Feathers are essential for wings and tails. Look for deer hair and dubbing for bodies. A good pair of scissors and a bobbin holder make tying easier. Don’t forget head cement for finishing flies. A small vise holds your hook securely.
- Hooks ► LINK – Available in various sizes (from tiny #28 to large #2/0) and styles (dry fly, nymph, streamer, curved, straight shank) to suit different fly patterns and fish species.
- Tying Thread ► LINK – Comes in different deniers (thicknesses) and colors. Start with a common size like 6/0 or 8/0 in black, white, and a neutral color like olive or tan.
- Dubbing ► LINK – Finely chopped natural or synthetic fibers used to create fuzzy bodies for flies. Comes in countless colors and textures.
- Feathers ► LINK – A vast category including hackle (rooster neck/saddle for dry fly and wet fly collars), marabou (for soft, flowing tails and bodies), pheasant tail, peacock herl, CDC (Cul de Canard), and more.
- Furs ► LINK – Rabbit, squirrel, deer hair, and various synthetic furs are used for bodies, wings, and tails.
- Chenille ► LINK – A fuzzy, pipe-cleaner like material used for quick, bulky bodies.
- Tinsel/Flash ► LINK – Mylar or synthetic strands that add sparkle and attraction.
- Wire/Lead ► LINK – Used for weighting flies (especially nymphs) or ribbing.
- Head Cement/UV Resin ► LINK – To secure knots and add durability to the head of the fly.
The Basics of Fly Tying Techniques: How to Make Fly Fishing Lures
How to Start Fly Tying the EASY Way Video.Once you have your tools and materials, the process of how to make your own fly fishing lures involves a series of fundamental techniques. For beginners, it’s best to start with simple, effective patterns before moving on to more complex designs.
Steps
- Mounting the Hook: Securely clamp the hook in your vise, ensuring it’s stable and at a comfortable working angle.
- Starting the Thread: Attach your tying thread to the hook shank with a few tight wraps, working from behind the eye towards the bend.
- Building the Foundation (Underbody): Create a smooth, even layer of thread wraps along the hook shank. This provides a base for all subsequent materials.
- Attaching Materials: This is where the magic happens. Materials like tails, ribbing, body materials (dubbing, chenille), wings, and hackle are tied in at specific points along the hook shank using precise thread wraps.
- Dubbing: Twist dubbing fibers onto your thread to create a fuzzy “rope,” then wrap this rope around the hook to form the fly’s body.
- Hackle: Secure the base of a feather, then wrap it around the hook shank, often creating a collar or body.
- Wings: For dry flies, materials like deer hair or CDC are typically stacked, tied in, and trimmed to form upright or sloped wings.
- Forming the Body: Depending on the fly, the body can be formed with dubbing, chenille, wrapped feathers, or other materials, creating the desired shape and profile.
- Finishing the Head: Once all materials are attached, gather all remaining thread and perform a “whip finish” knot just behind the hook eye. This creates a neat, durable head for your fly.
- Applying Head Cement/UV Resin: A small drop of head cement or a dab of UV resin (cured with a UV light) is applied to the whip finish knot to permanently secure it and prevent the fly from unraveling.
Recommended Beginner Flies
Recommended Beginner Flies: Start with patterns that require minimal materials and simple techniques.
- Woolly Bugger: A versatile streamer pattern that teaches you about marabou tails, chenille bodies, and palmered hackle.
- San Juan Worm: Incredibly simple, often just chenille and thread, but highly effective.
- Pheasant Tail Nymph: Teaches you about segmented bodies, simple wing cases, and legs.
- Elk Hair Caddis: A classic dry fly that introduces deer hair wings and hackle.
There are countless online tutorials, books, and local fly tying classes that can guide you through the initial steps of how to make fly fishing lures. Many videos specifically target beginners and break down each technique clearly.
Beyond the Basics: Customization and Creativity
Once you’ve mastered the fundamentals of how to make your own fly fishing lures, you can begin to truly personalize your craft.
- Matching the Hatch: This is where your knowledge of entomology truly shines. Observe what insects are active on your local waters. What size are they? What color? How do they move? Then, try to replicate those characteristics in your flies. Sometimes, a subtle change in color or size can make all the difference.
- Experimentation: Don’t be afraid to try new materials or combine existing ones in novel ways. What if you add a bit of flash to a traditional nymph? Or use a different color hackle on a dry fly? Innovation often leads to unexpected success.
- Creating Signature Patterns: Over time, you might develop your own unique patterns that consistently fool fish in your local waters. These can become your “secret weapons,” giving you an edge over other anglers.
- Understanding Fly Design Principles: Think about how profile, movement, color, and size contribute to a fly’s effectiveness underwater. A well-designed fly not only looks good but performs optimally.
Fly Tying Tips
Fly Tying Tips Top 10 Essential Tips for Beginners Video.As you learn how to make your own fly fishing lures, you’ll encounter challenges. Don’t get discouraged!
- Patience is Key: Fly tying is a skill that improves with practice. Your first flies might look a bit rough, but they’ll likely still catch fish. Focus on neatness and consistency.
- Less is More: A common beginner mistake is using too much material. Overly bulky flies don’t sink well, don’t move naturally, and can be harder for fish to eat. Aim for sparse, precise application.
- Sharp Scissors: Keep your scissors sharp! Dull blades will fray materials and make clean cuts impossible.
- Good Lighting: Proper lighting is essential for seeing fine details and preventing eye strain.
- Organize Your Materials: As your collection grows, keeping materials organized will save you time and frustration.
- Don’t Be Afraid to Undo: If a step goes wrong, carefully unwrap the thread and try again. It’s part of the learning process.
Read our post Fly Fishing Tips for Beginners before you head out to the water.
Making Your Own Fly Fishing Lures Books
Would you Enjoy to Make Your Own Fly Fishing Lures? Lure making is The Art and Science of Spinnerbaits, Buzzbaits, Jigs, and Other Leadheads you can learn how to make your very own fishing lures.
Check out the list of Making Fishing Lures books below:
The History of Fly-Fishing in Fifty Flies Book

The Bug Book A Fly Fisher’s Guide to Trout Stream Insects

The Art of the Fishing Fly Hardcover Book By Tony Lolli

Fly Tying For Beginners How to Tie 50 Failsafe Flies

If you are a person whom a DIY project excites you and saving money to boot will make your day. You can get any of these Fly Tying books and learn how to make your very own. Check out our other post with more fishing books to read.
Why Bother Making Your Own? The Allure of the Home-Tied Fly
The decision to make your own fly fishing lures isn’t just about saving a few dollars, though that’s certainly a significant benefit. It’s about unlocking a new dimension of fly fishing. Did you know that old fishing lures could be worth some good money?
1) Cost-Effectiveness: Let’s face it, fly fishing can be an expensive hobby. Quality flies, especially specialty patterns, can cost several dollars each, and it’s inevitable that you’ll lose a few to snags, tree branches, or enthusiastic fish. Investing in a fly fishing lure making kit and raw materials might seem like an initial outlay, but over time, it will undoubtedly be cheaper than continually restocking your fly box. A single feather or small spool of thread can yield dozens of flies.
2) Unleash Customization and Creativity: Making your own fly fishing lures offers a big advantage. Commercially made flies are generic. They try to catch many fish in many places. But if you know what the fish are eating, you can make a perfect match. You can change colors, sizes, and materials. This helps you copy the exact bugs or small fish in your water. Imagine making a lure that looks just like a rare bug on your favorite river. Store-bought lures can’t do that.
Deeper Understanding of Entomology and Fish Behavior
3) Deeper Understanding of Entomology and Fish Behavior: When you tie flies, you’re forced to observe and understand the natural world more closely. You’ll learn about the life cycles of aquatic insects, the subtle nuances of their appearance, and how fish perceive their prey. This knowledge translates directly into better fishing, as you develop a keener eye for what fish are actually feeding on.
4) Immeasurable Satisfaction and Connection: There’s an unparalleled sense of accomplishment when a fish strikes a fly you painstakingly crafted with your own hands. It adds a deeply personal layer to the experience, transforming a simple catch into a testament to your patience, skill, and artistry. It’s a meditative process that connects you more intimately with the sport.
- A Rewarding Hobby: Fly tying is a hobby in itself, offering a creative outlet during the off-season or when you can’t be on the water. It’s a craft that combines artistry with practical application, providing endless opportunities for learning and improvement.
If you like bass fishing check out our post with the Best Bass Fishing Lures or trout best lures.
Other Posts That Might Help
- Create Fishing Lures at Home
- Catch Bass with Spring Lures
- Trout Lures for Any Season or Waters
- Effective Bass Lures for Big Catches
- Discover Valuable Antique Fishing Lures
- Essential Tools for Tying Fishing Knots
Frequently Asked Questions
How much does it cost to start making your own fly fishing lures? You can start for as little as $50-$100 for a basic make your own fly fishing lures kit or a beginner’s set of tools and a small selection of materials. More advanced kits or individual, higher-quality tools can range from $150-$300+. Remember, the initial investment is offset by the long-term savings on buying flies.
Is it hard to learn how to make fly fishing lures? Like any craft, it requires patience and practice, but it’s not inherently difficult. Many simple, effective patterns are relatively easy for beginners to learn. The key is to start with basic techniques and patterns, watch instructional videos, and don’t get discouraged if your first few flies aren’t perfect.
What’s the most essential tool for fly tying? The most essential tool is undoubtedly the vise. It holds the hook securely, freeing your hands to manipulate materials, which is crucial for all fly tying operations. A good quality vise will last a lifetime.
Can I really save money by making my own flies? Absolutely! While there’s an initial investment in tools and materials, the cost per fly you tie yourself is significantly lower than buying them. For example, a single hackle feather can tie dozens of dry flies, whereas a single store-bought dry fly might cost $2-$4 or more.
What are the first flies a beginner should learn to tie? Great beginner patterns that teach fundamental techniques include:
- Woolly Bugger: Teaches marabou tails, chenille bodies, and palmered hackle.
- San Juan Worm: Very simple, great for learning basic thread wraps.
- Pheasant Tail Nymph: Introduces segmented bodies and simple wing cases.
- Elk Hair Caddis: A classic dry fly that teaches deer hair wings and hackle.
Thank you for Reading Our Make Your Own Fly Fishing Lures Guide Post
Whether you’re a seasoned angler looking to customize your arsenal or a curious beginner eager to delve deeper, learning how to make your own fly fishing lures is an incredibly rewarding endeavor. The journey to make your own fly fishing lures is one that promises endless learning, creative satisfaction, and a deeper connection to the sport.
From the initial investment in a fly fishing lure making kit to mastering intricate patterns, every step is a rewarding experience. The journey to make your own fly fishing lures is one that promises endless learning, creative satisfaction, and a deeper connection to the sport. If you are a DIY person you can also try to make your own fishing pole. From the initial investment in a fly fishing lure making kit to mastering intricate patterns, every step is a rewarding experience.
The shift from simply buying flies to understanding how to make fly fishing lures transforms you from an angler into a true craftsman of the water. So, set up your vise, select your first materials, and prepare to experience the unparalleled thrill of catching a fish on a fly born from your own hands.
Happy fishing!
Fishing Stone post on several sites on Socia Media. By joining us on your favorite ones you can get updates on our latest Fishing Posts.
Find us on Facebook – Twitter – Pinterest – YouTube
Hope you have fun Fishing every day. Fish On!


Your article on making fly fishing lures was very helpful. It provided a lot of useful information. Thank you for sharing it.